
Event Reports
4x4 Riverland Challenge 2009
4x4 Mud Dust & Music 09
4x4 Riverland Challenge 08
Victoria 4WD Trip June 09
New Articles
AWD and Odd Sized Tyres
Outback Low Range Conversion
Windscreen, Spray then Wipe
Storage and Sleeping System
Project83
Intro - the idea and plan
4WD Conversion
Fender cutting
Radius Rod Mod
CD Player install EA81
Concept Subaru's
Bobbed Subaru Brumby
2005 Subaru Brumby/Brat
2door STi Convertible
Forester Pickup Truck
EA82 hatchback
Other Photochops
![]()
Subaru related Links
Forums
Ultimate Subaru
Message Board
Info Sites
Timing Belt Check and Adjustment

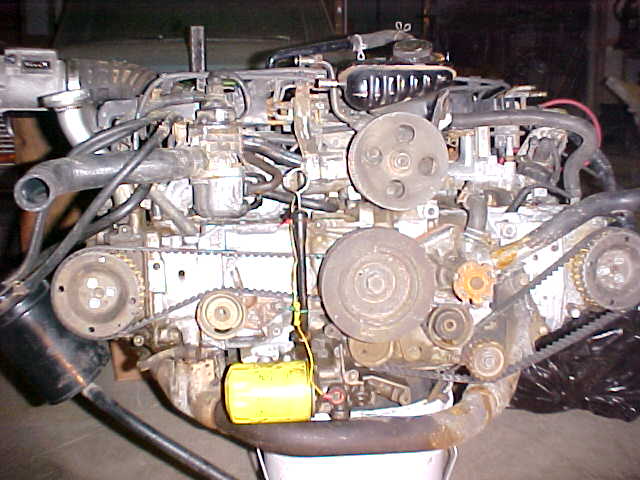
The Timing Belts can be Visually inspected and Adjusted by removing the outer belt covers and the tensioner access plugs.
To remove the outer belt covers, use a 10mm ¼" drive socket and remove the 3 bolts from both the left and right covers. The bolts thread into a brass fitting molded into the plastic. Be careful not to apply too much torque as it can crack the plastic. If indeed the brass fitting is spinning in the plastic, the timing cover can still be pulled away with gentle persuasion with a screwdriver. With the outer covers removed, you can check for the physical condition of the belt. Be aware of oil on the belts, as that may warrant an engine seal replacement. Oily belts will also be wakened. Check for cracks and frays on the belt, and that the teeth do not appear to have a definite seam where the teeth attach to the belt. Determine from the condition of the belts and the mileage at which they were last serviced to consider replacement.
If the belts check out ok, they can be adjusted. On the front of the center belt cover there are 2 access plugs for the tensioner pulleys, one for each side. Remove the plugs by hand or with a small screwdriver. I find it easiest to do the adjustment from under the car. It may be necessary to remove the skidplate on 4wd models. Use a 12mm 3/8" drive socket and extension.

Loosen both bolts a few turns on each tensioner. (DO NOT TAKE THEM OUT) With the bolts loose, the spring-loaded tensioner will take up any slack on the belt. It will also help to torque the cam pulley with a spanner wrench or other device. You can take a screwdriver and stick it on one of the holes on the cam sprocket, and use a hammer to gently "tap" the pulley on the left to the left, and the pulley on the right to the left also, to help take any slack out of the crankshaft drive side of the belt.
Now get back under the car and tighten up the tensioner bolts, and re-install the lugs and outer covers.
Inner Timing Belt Cover Removal
Follow the Radiator Removal or Engine Removal Procedure on Miles Fox's website, a great resource for information regarding EA series Subaru's.

You will have to remove the timing belt covers to service timing belts, engine seals, oil and water pump.
Remove all the belts to the engine ancillaries. Some AC equipped models you will have to remove the compressor and bracket as a unit, as part of it comes in front of the belt covers.
First off, loosen the 22mm crank pulley. You can put the car in gear on Manual Transmission models. But for all models, you can brace a breaker bar against the DRIVER side of the car(USA), and bump the starter to break the torque loose. A prybar can also be stuck into the flexplate through the timing window to loosen or tighten the crank pulley bolt.

Remove the dipstick and its tube with a 12mm wrench. Disconnect the Oil Pressure sending unit wire that comes down in front of the cover. Remove the outer belt cover as described above. Now with the crank pulley off, remove all the 10mm bolts from the inner cover. The bolts along the bottom will have 10mm nuts behind them. If you need to remove the plastic behind the timing belts, the cam sprockets and idler pulley must be removed.
Timing Belt Removal and Installation

Now that we have the Timing Belt Covers off, we can service or replace the timing belts. Re-install the crank pulley and bolt. Turn the bolt clockwise so that you line up the tree belt timing marks on the flywheel with the notch on the bell housing. They will be 3 lines in a row; they are separate marks than for the ignition timing (0 deg).

With the belt marks on the flywheel lined up, turn the driver side cam sprocket so that the dot on the sprocket is pointing UP with the notch on the inner plastic. Now install the driver side belt (in the case of a broken belt, the passenger side belt has to be removed to install the driver side belt).

Adjust the tension in the same manner described in Timing Belt Check and Adjustment. Now turn the crank bolt 360 degrees, one full rotation, so that the driver side cam sprocket makes a 180 deg rotation so it is pointing DOWN.


Now turn the passenger side cam so that its dot faces UP with the notch on the inner plastic. Install the passenger side belt and adjust the tension.

Next turn the crank another full 360 deg rotation so that the passenger cam is pointing down, and the DRIVER side cam is pointing UP. With the driver side cam pointing up, the 3 timing belt marks will be in line. So with the 3 marks in line, turn the crank clockwise until the 0deg BTDC mark comes up. Use this mark to install the Distributor if it has been taken out.

With all the marks verified as lined up, put all the covers back together, job is complete!
Text and pictures on this site Copyright © 2005 Thomas Paine. All rights reserved. All copyrights are retained by original authors. If you wish to use a picture or quote the text off this site to your own site or to a online forum please ask for permission first. If you use anything off this site that may lead to damage of my reputation I will have to take the matter further. So do not piss me off!
DISCLAIMER: Thomas Paine, www.OffroadingSubarus.com, does not warrant or make any representation regarding the use, or results of use of the information contained on and within this website as to its correctness, accuracy, currency or otherwise. Thomas Paine, www.OffroadingSubarus.com, expressly disclaim all liability or responsibility to any person using the information or advice contained on and within this website.