Welding the R160 in the rear of your Subaru Welded Subaru Diff
This is a very popular mod for offroading a Subaru. Because of the lack of aftermarket parts for these great little four wheel drives we have to resort to doing things are selves. Which I think is great, because you can say exactly what you have done to your car while others are left just saying “well the shop done this, but I have no idea how they done it.”
The idea of welded your rear differential is to gain traction. With a open diff when you lift a wheel off the ground the other wheel stops and the one in the air spins like crazy, giving you no power on the ground. The only draw backs to welding your rear diff is you have to remove a rear driveshaft (some call them axles or half shafts, lets just say the part that joins your diff to your wheels.) This also means when you hit a dirt road you won’t be able to use 4WD, you can put it in 4WD, but this will be more like 3WD and it feels quite weird to drive. It is possible to drive onroad with both driveshafts in and a welded rear diff, but you run the risk of damaging tyres and breaking off a spline on your diff.
In this article I will show you how to remove your diff, clean it, weld it, and put it back in. I will also show you how to remove your rear axle for when you drive onroad.
First of all you can weld the diff in place if you have a way to get under the car with plenty of room. But I prefer to take the diff out, as you will need to get one of those driveshafts off some time for when you drive onroad. To remove the rear diff follow these steps, or just make it up as you go along, what ever works best for you.
1: Jack the car up and place on jack stands or stable blocks on both sides of the rear end of the car.
 2: Unbolt the propshaft, this is the shaft between the gearbox and rear differential. There are 4 bolts with nuts holding it on. You shouldn’t need to hold the bolts with a spanner because the shape of the mount holds them still. So just undo the nuts. You may need to stick the gearbox in 4WD or the prop will spin because the rear wheels are off the ground.
3: Remove the pins holding the DOJ cups onto the diff and hub splines on both driveshafts. If your lucky the cups will come lose with only a little jiggerling, but more likely (because of 20 years of rust) they won’t, if so pay good attention to step 5.
4: Unbolt the front mount point, this is a large single bolt that holds the top of the diff to the crossmember/torsion bar. Remove the nuts on back of the diff hanger that hold the back of the diff to the car. Pull the diff forwards. Warning, these are cast iron, which means very heavy.
5: If your driveshafts are still attached at this point they should catch the diff before it hits the ground. This next part can get interesting, so be patient. I have found the only thing you can do to remove these shafts is via a hammer. There is no where safe to lever and they normally don’t have any edges for a lever to grip on. So the basic thing to do is fill the pin holes and every other part of the cup with lots of WD40 or what ever you happen to have. Then hit them with a big hammer repetitively. You may notice you can dent the cup, that’s ok, they can take it. I have a speculation that using 4WD onroad a fair bit loosened mine, so you may want to try this.
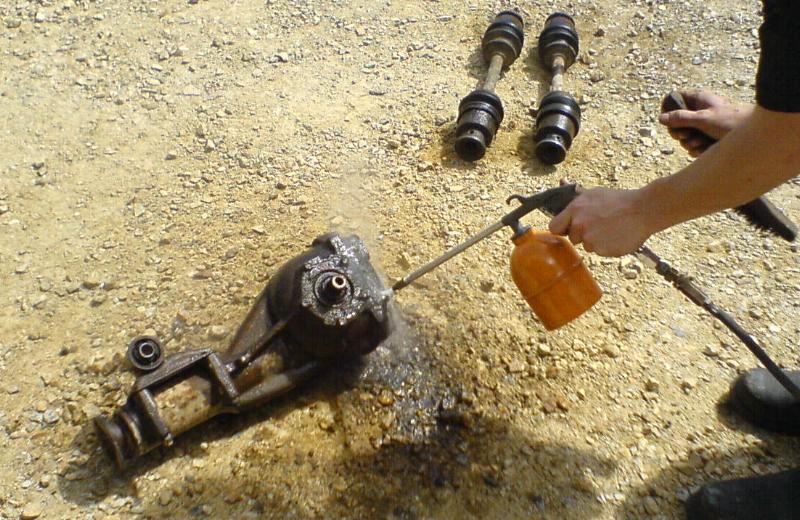
 6: Once the drive shafts are off (sorry if you are still having problems getting the shafts off, I really can’t help you there much more.) the differential should come out. Take the drain plug off the back to drain all the oil. Also with some pliers remove the breather.
7: Unbolt the back plate to the diff and both side plates (that hold the bearings.) Keep all the shim spacers on the side plates together as these are important in keeping your diff tensioned properly and your gear backlash at the requirement.
8: If you have the right socket you should remove the splines and take the center of the diff out before welding, how ever I did not do this because I did not have the right tool.
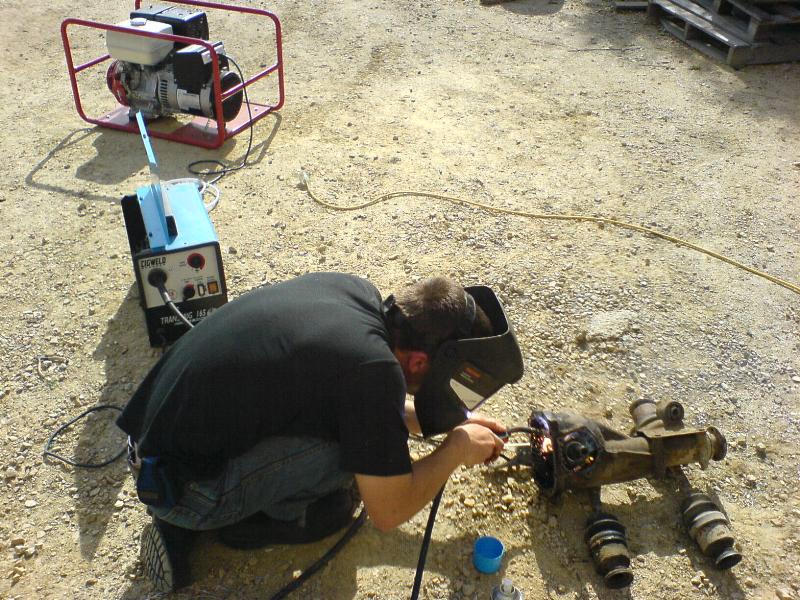
9: Clean the spider gears with kero or prepwash. Then clean with water, this is to prevent the whole diff lighting up on fire. in your face as soon as you start to weld.
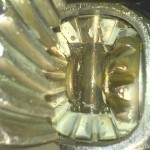
10: Once dry get your welder out and set it to high, this is tough metal. You can use a arch welder, but a mig will do a much better job. The basic thing to do here is weld the spider gears together. Once these are locked tight by weld they won’t be able to move which is what the differential was made to do. If done correctly it should look something like this.


11: Clean thoroughly.
12: Bolt the bearing side plates back on with a smear of silicone between all shim layers and on the diff casing. Tighten to 12nm.
13: Bolt the rear cover back on, tighten to 25nm.
14: Fill with 800cc of transmission oil 80W -90 is good or until the oil comes out the top filler plug when the differential is level.
15: Slide the rear studs back into the diff hanger, do nuts up finger tight. Put the front mount bolt through and tighten, then tighten the rear nuts.
16: Bolt the propshaft back on to the diff using 4WD and the handbrake.
17: Put the driveshafts back in making sure the roll pin holes line up. Insert the roll pins into the left driveshafts cups and use a bit of fence wire or similar for the right shaft.
18: Take your jack stands out and lower the car. Then make sure everything looks how it should.
You are now ready to take the car for a test drive, if you have some dirt to drive on have a play and I’m sure you’ll be as amazed as I was with the grip you will now have.
To remove the rear driveshaft for onroad driving do the following
1: Jack up the rear right side of your car.
2: Remove the wire that holds the DOJ cup on to the spline.
3: Pull the DOJ off of the diff side, pushing on it upwards is usually best to get it totally off the spline.
4: Pull on the whole shaft and it should slide off the hub side.
5: Jack down your car and you are ready to go.
NOTE: You don’t need to place jack stand under the car because if it falls it can’t land on you because the wheel is still on. The jacking is only there to get more angle on the shaft therefore making it “longer.”
NOTE: You remove the right shaft because for a unknown reason it is easier. For some reason it was made with more clearance.
NOTE: On later EA82’s they had a DOJ at the diff and a CV at the hub. This made it harder for removal and you may need to cut 3mm to 5mm off of the diff stub with an angle grinder.
I am not responsible for any unfortunate mistakes that may occur during the process that is stated here. Do at your own risk. and most importantly, have fun once it’s done!
![]()
I bought my first Subaru back in 2005, it was a 89 Brumby, flair red. I lifted it, fitted Kumho 27″ MT’s. After a while I swapped the dual carb EA81 it had with an EJ22 bolted on a custom gearbox which used EJ D/R casing, EA82 5sp low range and an RX centre locking diff. Once I sold the Brumby I got a 83 Leone. Converted it to 4WD, put the Kumho’s on it, added a 5sp and drove it like I stole it. I then upgraded to a 99 Outback. It was hail damaged so I repaired it myself. I fitted it out with some storage and a mattress. I now have a 87 Brumby that I’ve resprayed with two pack urethane in Waratah Red. I am planning to fit an EJ with PT gearbox and a little bit of lift. It’s another project in progress.
Phizinza – who has written 50 posts on Offroading Subarus.