
Event Reports
4x4 Riverland Challenge 2009
4x4 Mud Dust & Music 09
4x4 Riverland Challenge 08
Victoria 4WD Trip June 09
New Articles
AWD and Odd Sized Tyres
Outback Low Range Conversion
Windscreen, Spray then Wipe
Storage and Sleeping System
Project83
Intro - the idea and plan
4WD Conversion
Fender cutting
Radius Rod Mod
CD Player install EA81
Concept Subaru's
Bobbed Subaru Brumby
2005 Subaru Brumby/Brat
2door STi Convertible
Forester Pickup Truck
EA82 hatchback
Other Photochops
![]()
Subaru related Links
Forums
Ultimate Subaru
Message Board
Info Sites
I've done this modification to my carburetor with great results in acceleration and highway speed's. This modification may impact emissions results so if you need to pass emission tests in the future you might want to get a spare carburetor from the Junk Yard to perform this operation on. NOTE: This modification will only work on the EA81 series Hitachi's. Although the same modification is possible for the EA82 Hitachi's, I have not performed it, or do I have images available for the modification.
Just a little background about this modification and the reason why I did this. The Hitachi carburetor has 2 barrels, but only the primary barrel will open under acceleration. It is not until the gas peddle is fully depressed and a certain amount of vacuum is created in the intake manifold that the 2nd barrel will open up. This modification will bypass the vacuum actuator on the hitachi and force the 2nd barrel to open when the 1st barrel reaches 1/3 throttle.
Lets Get started shall we? Here are some diagrams of the part of the carburetor we will need to play with. You will not have to disassemble the carburetor at all, so almost anyone should be able to do this mod.
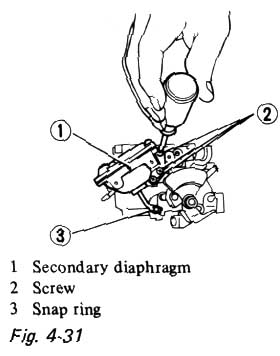
Here in this figure we see the diaphragm that will need to be removed. It is held on by 3 screws (#2 in the diagram) and is also held on by the snap ring at the end of the diaphragm arm. You will want to plug the hole in the carburetor that the diaphragm connects to.
After you have the diaphragm removed, play around with the carburetor a little and notice how there is a lever for the primary and the secondary barrel.
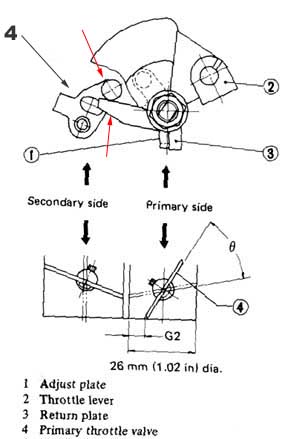
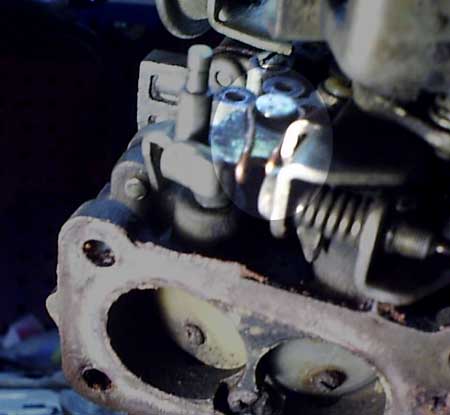
Here is a close up of the moving parts that we will play with. #3 in the diagram is the actual throttle lever that connects to the throttle cable. #4 is the secondary lever that we need to make move. I've put red arrow's on the contact point where we need to attach the primary and secondary plates. I have heard of people welding it together right there, but I don't have a welder, nore do I like that idea all too much.
I took a piece of coat hanger and cut off a piece about 4" long and bent it to the desired shape.
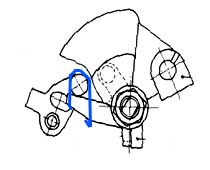
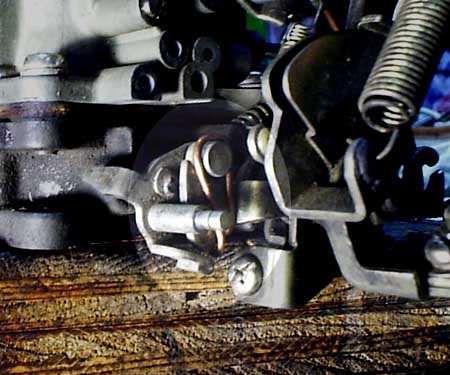
Here you can see how the wire should go. It might take a little time in order to get it just right. Here are some pictures of the actual modification on my carburetor:
And here are some short movie clips of the modification in action:
Both movies are under 500k in file size, so it wont take long to download them.
--- Additional Info:
Throttle response is iffy. It actually creates a huge dead spot when you step on it. Because you are forcing the secondary open, the jets arent primed and you end up sucking in alot of air, with no fuel. Only until the jet for the secondary gets fuel, then everything's a go. Power is felt past 1/3 throttle when you step on that. If done right, you can rev the engine a little and get the secondary to open up, force the jet to prime. Then when the light turns green dump the clutch and romp on it... seems to accelerate alot better than stock. But if your just cruisin everyday driving, the dead spot can suck if your not expecting it.
I suggest doing this to a spare carburetor. I did it to a junkyard carb and swapped back and forth between the 2.
-Brian
Text and pictures on this site Copyright © 2005 Thomas Paine. All rights reserved. All copyrights are retained by original authors. If you wish to use a picture or quote the text off this site to your own site or to a online forum please ask for permission first. If you use anything off this site that may lead to damage of my reputation I will have to take the matter further. So do not piss me off!
DISCLAIMER: Thomas Paine, www.OffroadingSubarus.com, does not warrant or make any representation regarding the use, or results of use of the information contained on and within this website as to its correctness, accuracy, currency or otherwise. Thomas Paine, www.OffroadingSubarus.com, expressly disclaim all liability or responsibility to any person using the information or advice contained on and within this website.